How to Find Failures Faster in Jenkins Test Results
The Continuous Integration (CI) process involves routinely testing an application for bugs the moment any code changes are added to the repository. CI systems such as Jenkins, use plugins to automate this testing process. Unfortunately, reproducing failures found in Jenkins test results can be both time-consuming and inaccurate.
In this blog, we look at how teams can skip the Jenkins test result analysis and reproduction steps, and instead use a recording of the Jenkins test to quickly diagnose and fix the failure point. Additionally, we'll look at how to integrate the necessary technology directly into a Jenkins CI environment and how to run test cases.
Table of Contents
Analyzing Failures in Jenkins Test Results
When a failure appears in Jenkins test results, it requires an engineer’s time to analyze the failure, figure out how to address the failure, and make changes. There are several factors that often complicate the debugging process:
- Intermittent failures: The test failure is intermittent and hard to reproduce.
- Different development/test environments: The Continuous Integration environment in which the test failed is not accessible by the engineer. Replicating the exact same environment to reproduce the failure takes effort and time.
A Better Way to Diagnose and Fix Failures
But what if the engineer could access a “recording” of the test program's execution at the time of the failure? The recording could then be used to analyze the test run that produced the failure – without the engineer having to replicate the test environment or gain access to special machines. This would save time finding the bug, and help the engineer diagnose and fix the issue faster.
Such a technology exists! It is part of the TotalView ReplayEngine execution recording engine.
Back to topA previous post on integrating memory leak detection into Continuous Integration gives a high-level overview of TotalView program execution recording technology and how it is used in a CI environment to record test execution and provide recording files for later analysis.
Jenkins and JUnit – An Open-Source CI Solution
There are several CI systems available for development teams, each with their own pros and cons. Jenkins is one of the popular solutions.
Jenkins is an open-source project providing a self-contained automation server, used for automating different tasks including building a software application using a CI process. Jenkins plugins are available, extending its capabilities and functionality. One plugin for automated testing is JUnit.
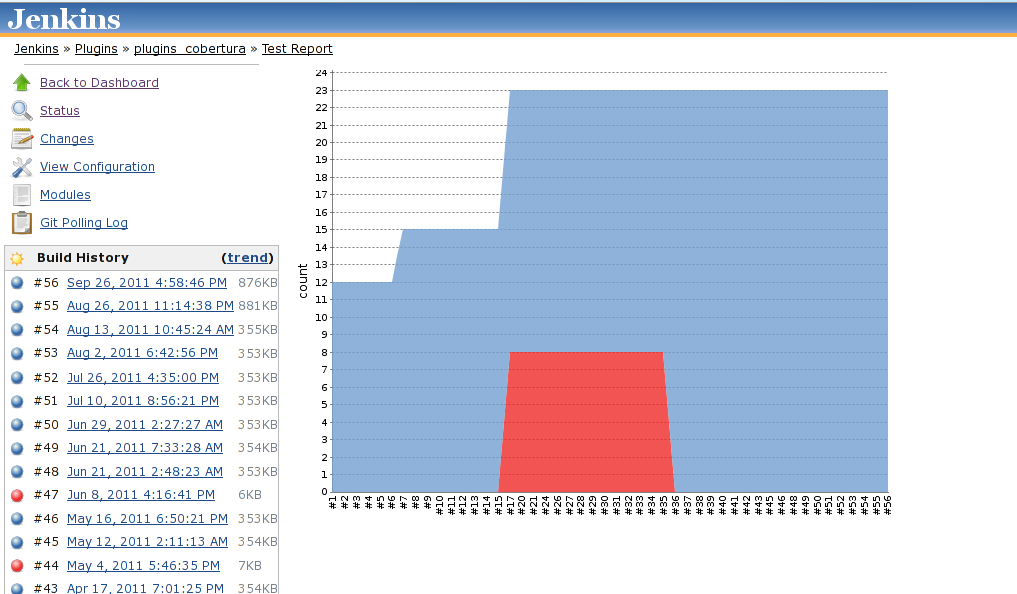
The Jenkins JUnit plugin provides capabilities to consume XML test reports generated as part of building the product. The XML reports contain information about the tests run during a Jenkins job. JUnit consumes the XML test information and provides graphical visualizations, using the Jenkins JUnit graph plugin, of the historical test results:

TotalView’s solution leverages both JUnit and the JUnit Attachments plugins, so that TotalView’s test program recording files become part of the test results presented in Jenkins. To incorporate TotalView recording results into Jenkins, we’ll generate JUnit XML consumable files with information about each test that generated a recording file.
Back to topSee TotalView in action! Join a live demo and ask our expert your questions.
Save your spot
Adding TotalView Test Program Recording to Jenkins
There are a few simple steps to record the execution of test programs under a Jenkins CI process.
1. Install Jenkins JUnit Plugin
Typically, the JUnit plugin gets installed during the Jenkins installation. To double check, select Manage Jenkins from the dashboard, then select Manage Plugins. Click on the Installed tab and type “junit” in the filter box. JUnit Plugin should show up in the list. If it does not, click on the Available tab, search for “junit” again and install the plugin.
2. Install Jenkins JUnit Attachments Plugin
Using the same approach, first select Manage Jenkins from the dashboard, then select Manage Plugins. Click on the Available tab and type “junit attachments” in the filter box. The Jenkins JUnit Attachments Plugin should show up in the list. Install it.
3. Run Tests Under the Control of TotalView Recording Engine in Jenkins
With Jenkins and the needed JUnit plugins prepared, it’s time to record the execution of the test applications.
For this example, we will run a test application that crashes. The tx_simple_crash application can be built as part of the Jenkins job or by executing the following command from the terminal and making the final executable accessible to our Jenkins test project.
Download the tx_simple_crash source file (remove the .txt extension)>>
g++ -g tx_simple_crash.cxx -o tx_simple_crash
To configure a Jenkins test project, first start from your Jenkins dashboard and click on New Item.

For this session, we create a Freestyle project to record the execution of the test application. Enter an item name for the project, click on Freestyle project, and then click the OK button.

Jenkins creates the new Freestyle project and presents a page with various options. For this example. we’re only concerned with the Build section. Click on the Build tab at the top of the page and then select Execute shell from the Add build step menu.
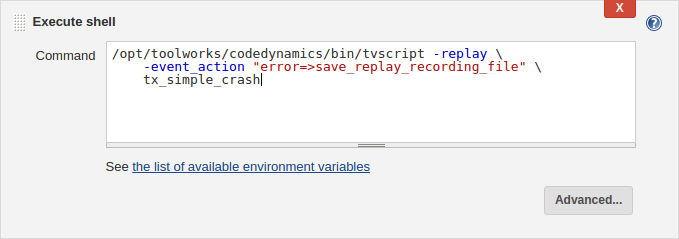
Jenkins will present the following form for providing a command to execute within a shell. It is here that we are going to run our tx_simple_crash test application under the control of TotalView's execution recording engine, called ReplayEngine, using its scripting interface, tvscript.
Enter the following command into the Command field for Execute shell.
/opt/toolworks/totalview/bin/tvscript -replay \
   -event_action "error=>save_replay_recording_file" \
   tx_simple_crash
Note: The path to tvscript may need to be adjusted depending on where TotalView is installed.
In this scenario, we are running the target application under the control of tvscript directly within Jenkins. Depending on the test harness you run your test applications under, you will apply the same technique.

The TotalView script, tvscript, provides a variety of facilities to run an application in a non-interactive way. Its whole goal is to monitor the execution of the application, pick up an error, and provide mechanisms for analyzing and debugging an application. Tvscript lets you record the execution of a target application and save the recording out to a file. Developers can load the file into TotalView for replay and debugging.
To turn on recording for a target application, you provide the -replay flag to tvscript, but tvscript also needs to know when to save the recording file. In this case, we want to save the recording file on application crash. This is accomplished by providing an event/action pair instruction to tvscript using -event_action “error=>save_replay_recording_file” as a command line argument. The final argument to tvscript is the name of the target application run under the control of tvscript. There are numerous other events and actions that tvscript can perform. Issue tvscript -help for a quick summary.
The job is now configured to run the test application under tvscript and save an execution history recording file if the target application crashes. When Jenkins runs our job, tvscript will generate a human-readable log file with textual information about any problems. The final step is to detect that a recording file was generated, mine information out of the tvscript log files, and prepare the information to be displayed in Jenkins through the JUnit plugin.
4. Converting tvscript .log Files into JUnit XML Files
Currently, tvscript generates text log file which contains human-readable information about any errors generated by the application or if any recording files were generated by the TotalView ReplayEngine. An example log file is as follows:
*******************************************************************************
* TotalView Debugger Script Log File
*
* Date:    08-23-2017_15:11:58
* Target:  tx_simple_crash
* Event/Action Directives:
*   error =>
      save_replay_recording_file
*******************************************************************************

Running target tx_simple_crash

!!!!!!!!!!!!!!!!!!!!!!!!!!!!!!!!!!!!!!!!!!!!!!!!!!!!!!!!!!!!!!!!!!!!!!!!!!!!!!!
! Process Error Notification
!
! Process:
!   tx_simple_crash (Debugger Process ID:  1, System ID:  86332)
! Thread:
!   Debugger ID:  1.1, System ID:  86332
! Error:
!   Segmentation violation
! Error Location:
!   >  0 godump           PC=0x0040061a, FP=0x7ffd5ddab680
[/mnt/development/bburns/.jenkins/workspace/record-test/tx_simple_crash.cxx#17]
!      1 main             PC=0x00400659, FP=0x7ffd5ddab6a0
[/mnt/development/bburns/.jenkins/workspace/record-test/tx_simple_crash.cxx#24]
!      2 __libc_start_main PC=0x7f15b3705f43, FP=0x7ffd5ddab760
[/usr/lib/debug/lib/x86_64-linux-gnu/libc-2.19.so]
!      3 _start           PC=0x004004f4, FP=0x7ffd5ddab768
[/mnt/development/bburns/.jenkins/workspace/record-test/tx_simple_crash]
!!!!!!!!!!!!!!!!!!!!!!!!!!!!!!!!!!!!!!!!!!!!!!!!!!!!!!!!!!!!!!!!!!!!!!!!!!!!!!!

** Performing action save_replay_recording_file for event error
** 08-23-2017 15:11:58 - Saving replay recording file to file tx_simple_crash-86332_08-23-2017_15:11:58.1.recording
To bring this information into Jenkins, we leverage JUnit’s capabilities to read test result information from XML files.
Using a handy Python script, we are going to convert tvscript log file information into JUnit’s XML file format. When run, the script takes the JUnit XML filename to produce and one or more tvscript generated log files.
Download the Python script (remove the .txt extension)>>
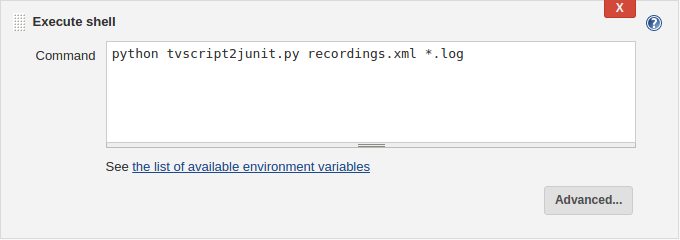
python tvscript2junit.py recordings.xml *.log
For a single log file, the script will produce an XML file like the following:
<!--?xml version="1.0" encoding="UTF-8" ?-->
<testsuites name="Replay Recordings" tests="1" failures="1">
  <testsuite name="Replay Recordings" tests="1" failures="1">
    <testcase classname="recordings" name="tx_simple_crash">
      <error message="tx_simple_crash exited due to an error.">
<![CDATA[
! Process Error Notification
!
! Process:
! tx_simple_crash (Debugger Process ID: 1, System ID: 86332)
! Thread:
! Debugger ID: 1.1, System ID: 86332
! Error:
! Segmentation violation
! Error Location:
! >  0 godump           PC=0x0040061a, FP=0x7ffd5ddab680
[/mnt/development/bburns/.jenkins/workspace/record-test/tx_simple_crash.cxx#17]
!      1 main             PC=0x00400659, FP=0x7ffd5ddab6a0
[/mnt/development/bburns/.jenkins/workspace/record-test/tx_simple_crash.cxx#24]
!      2 __libc_start_main PC=0x7f15b3705f43, FP=0x7ffd5ddab760
[/usr/lib/debug/lib/x86_64-linux-gnu/libc-2.19.so]
!      3 _start           PC=0x004004f4, FP=0x7ffd5ddab768
[/mnt/development/bburns/.jenkins/workspace/record-test/tx_simple_crash]
]]>
      </error>
    </testcase>
  </testsuite>
</testsuites>
Finally, there’s one more step to perform and that is to attach the recordings file to the Jenkins test results.
5. Attaching Recording Files to JUnit Test Results Using JUnit Attachments
In addition to the generated log files, if the program crashed, tvscript generates execution history recordings. Downloading the recording file directly from Jenkins test pages enables developers to begin analysis of what went wrong. To attach the recordings files to the Jenkins test results we’ll leverage the JUnits Attachment plugin.
JUnit Attachments provides two mechanisms for attaching files:
1) Placing files in a directory named the same as the test class
2) Printing out the file name in a format that Jenkins will understand
We’ll follow the first pattern.
When Jenkins runs our job, all tvscript log files and recordings files are placed in a Jenkins workspace directory. When we analyze the tvscript log files to produce the JUnit XML file, it too is placed in the workspace directory. Using the JUnit Attachments mechanism of placing all files in a directory named the same as the test class, we can attach any recordings files to the JUnit test results by placing them in the test class directory.
The actual process of doing this is simple and occurs when running the tvscript2junit.py script. First, using a test class named “recordings”, create a directory named “recordings” in the Jenkins workspace directory. Next, for each tvscript log file that included a recordings file, create a link to the file from the recordings directory. The generated JUnit XML file also needs to mark each test as part of the “recordings” test class.
Generate the JUnit XML file and create the links to recordings files from within a “recordings” test class directory, by adding another Execute shell build step to the project and enter the tvscript2junit.py command. Place the tvscript2junit.py script in the Jenkins workspace directory. You may need to adjust paths based on where your tvscript2junit.py script is located if you put it in a different location.

Our project is ready to run. It will generate a recordings file if the test crashes and converts the tvscript generated log files into JUnit consumable XML files. The final step before we run our project is to tell Jenkins where to fetch the JUnit XML files and publish a JUnit test results report.
6. Publishing Jenkins Unit Test Report With Recordings
In order for JUnit to generate test reports, it needs know where to put the XML files with test result data. To do this, click on Add post-build action at the bottom of our project configuration and then select Publish JUnit test result report. As an aside, the XML files generated by tvscript2junit.py are compatible with the xUnit test reporting plugin.

The following form is displayed. This form allows you to specify where to pick up JUnit XML files. We can simply enter tvscript.xml in the Test report XMLs field since we generate the tvscript.xml files into the Jenkins workspace area.

Before saving the project, click the “Add” button for Additional test report features and select Publish test attachments. This engages the JUnits Attachment plugin to scan the JUnit test results and pick the recordings and attach them to the test report.

Finally, click Save to save our project.
7. Generating Execution History Recordings and Accessing Them in Jenkins
With our project configured, click Build Now from the project dashboard to run the JUnit test cases in Jenkins.

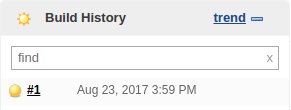
Jenkins runs our project and show the most recent build in the Build History on the dashboard.

The build is marked as yellow, indicating there is a problem. Let’s explore the test results.
Back to topExploring Recordings in Jenkins Test Results
Clicking on the build #1 link in the Build History section brings up a summary of the status.

There is one test failure in the tx_simple_crash test application. Clicking on the link gives details about the failure. This information was captured from the tvscript log file.

The Error Message reports the test failed due to an error. The “Stacktrace” area provides the contents of the log file generated by tvscript, including details about the error.
The recordings file is not available at this location since it is an attachment and the JUnit Attachments plugin associates all attachments at the class level. To find the attachments click on the “recordings” link in the bread crumb links.

Jenkins will display a page with all the tests that generated recordings files attachments.

The developer can download the recording file and load it into TotalView. Within TotalView, they can conduct debugging and move forward and backward through execution history to determine the cause of the crash.

Learn learn more about TotalView reverse debugging capabilities>>
Back to topOther Ways to Use tvscript to Generate Recording Files
The example in this article generated an execution recording file if the test program crashes. It’s not always the case that tests result in a crash but instead, simply fail with erroneous results. In these cases, tvscript can be instructed to generate recording files if a certain location in code indicating the failure is hit, just before the program is due to exit or based on custom conditions that you code into your own tvscript action handler. Here are a few examples:
Save a recording file just before the program exits:
tvscript -replay \
	-event_action “stopped_at_end=>save_replay_recording_file” \
	myTestProgram
Save a recording file if a line 85 of file myfile.cxx is hit:
tvscript -replay \
	-create_actionpoint “myfile.cxx#85=>save_replay_recording_file” \
	myTestProgram
Benefits of Recording Tests in a CI Environment
Incorporating TotaView test program recording into your Continuous Integration environment provides many benefits:
- No need to reproduce the environment and circumstances that caused the failure.
- Easy integration with Jenkins plugins and unit test reports using tvscript2junit.py script.
- Easy diagnosis and debugging, once recordings are loaded into TotalView.
- XML files are also compatible with the xUnit XML file format, for inclusion into xUnit testing results.
Further reading
- Blog: How to Integrate Leak Detection into any CI Tool
- How Jenkins CI Parses and Displays JUnit Output
- JUnit Plugin
- JUnit Attachments Plugin
- xUnit Plugin
