
Guide to Remote Debugging and Development
With many businesses moving to remote working due to COVID-19, teams now face the challenge of supporting remote workers. For development teams, that can mean configuring remote system access for remote development and remote debugging.
Setting up remote access to internal workstations and servers in order to allow for remote development and remote debugging can often be a challenge. Security is always a concern but there may also be multiple "hops" involved in order to start from the computer you are sitting at and finally reaching the system you are developing on. TotalView’s remote debugging capabilities are built exactly for these remote access scenarios.
In this article, we look at three different ways to enable remote debugging workflows using TotalView technologies:
- Debug remotely from your local system.
- Debugging through remote desktops.
- Disconnect starting of the debug target from the debugger user interface.
Debug Remotely from Your Local System
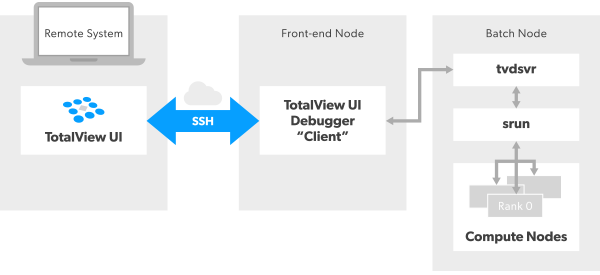
TotalView’s Remote User Interface (UI) feature allows you to run the debugger from your local system, such as your laptop, and efficiently, and securely, conduct your debugging session on a remote system or cluster. As depicted below, the TotalView user interface is running on a remote laptop and communicating to the TotalView Debugger “Client” on a remote system. Target applications can be debugged on the “front-end” system or, as in the case of an HPC cluster, TotalView will debug remote processes running across all the compute nodes within the cluster.
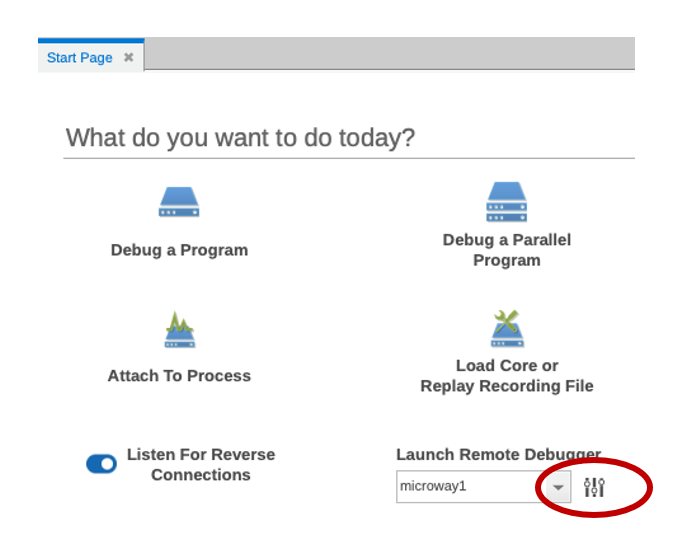
The TotalView Remote UI debugging workflow is easy to setup. First, configure the remote system to debug on by clicking on the settings icon for Launch Remote Debugger on the Start Page.
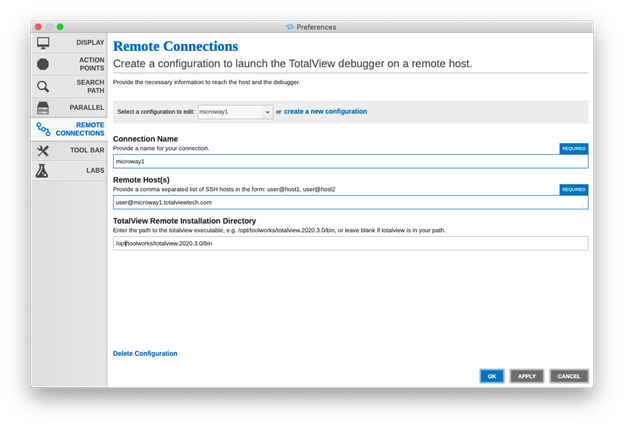
On the Remote Connections preferences page, click create a new configuration to create a new remote host connection. Enter the connection name, hosts to SSH through to get to the final host to run TotalView on, and the installation directory of TotalView on the remote system.
With the configuration set and now back on the Start Page, select the remote connection from the Launch Remote Debugger dropdown.

TotalView will then launch a remote debugger on the specified target host. Now, simply use TotalView as you normally would, load a program to debug, set breakpoints, etc., and conduct your debugging!
Read this blog on connecting Remote UI with Username/Password vs Private Key >>
Debugging through Remote Desktops
Sometimes having an entire remote virtual desktop provides additional flexibility needed to conduct a successful debugging session. TotalView's Remote Display Client is a free tool shipped with TotalView that allows developers to easily establish a remote development session by automatically setting up a remote display environment from a remote system, across multiple connecting computers, and to the user's laptop.
The RDC does this through the following three components:
- RDC Client: A Remote Display window runs on the computer you are sitting at. Supported platforms include Linux x86 (32 and 64 bit), Windows, and macOS.
- RDC Server: An "invisible" component responsible for managing the movement of information between the Viewer, the remote host, and the Client. The Server can run on all systems that TotalView supports. For example, you can run the Client on a Windows system and set up a Viewer environment on a Linux x86-64 machine.
- RDC Viewer: A window that appears on the Client system. All interactions between this window and the system running TotalView are handled by the Server.

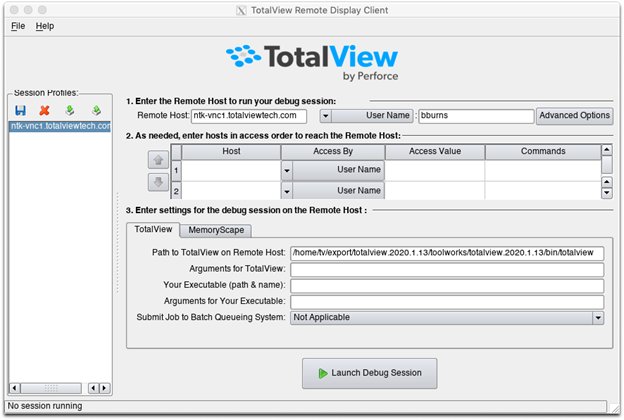
The RDC Client front-end allows you to define the name of the host where development will take place, zero or more "hosts in access order" that define connections that must be established in order to reach the final development host, and how TotalView should be run on the development system.
When instructed, the Client establishes all of the secure connections to the final development system and launches a backend Remote Display Server. Finally, the Client will launch the Viewer component on your laptop, allowing you to work on the remote development system.
The final remote display architecture setup by the RDC provides for an efficient debugging environment that can be used from home, while traveling, or just to access a cluster running in a remote lab.
For more information about using the TotalView Remote Display Client, please see the User Guide documentation.
Using VNC Technology to Access Remote Systems |
|---|
Having the ability to efficiently work on remote systems is a requirement of many developers and scientists. Often, computing resources are in a lab, in the cloud, on the other side of the country, or maybe you are just working at home and need to access systems back in the office. There are several "remote screen" technologies that provide the ability to work on a virtual desktop on your laptop that is projecting a display running on a remote machine. These technologies are efficient and secure. VNC Technologies Commercial versions such as NX from NoMachine provide nice solutions, but there are also many solid open source versions to choose from as well. Many of the open source solutions utilize Virtual Network Computing (VNC) technology which provide a remote graphical desktop that is displayed through a viewer running on a client system. Some popular open source VNC solutions include TightVNC, RealVNC and TigerVNC. Setting up a VNC environment is simple. First, the VNC server is installed on the remote system where the graphical desktop is to be run. Once installed, the VNC server is started it will begin listening to a specific network port on the host. Next, the VNC viewer is installed on the client's laptop or desktop. Finally, the VNC viewer is directed to connect to the remote server using the hostname and network port that the VNC server was configured to use. Secure network connections between the viewer and server are established using dependable secure shell (SSH) connections. The VNC viewer displays the remote graphical desktop and enables you to efficiently run your graphical applications on the remote system. |
Disconnect Starting of the Debug Target from the Debugger UI
In some scenarios it is easier to start the target application to be debugged externally from the debugger and once it runs, then establish the debugging session back to the TotalView user interface.
One common use case for this remote debugging scenario is when a parallel job is launched into a cluster. In this case, a job scheduler will allocate nodes to run the target application on and then run the job. Developers will often have to wait a period of time for the job to launch.
Using TotalView Reverse Connect, a job is launched under the control of TotalView’s tvconnect command. When the job is run a remote debugging connection will be made back to a waiting TotalView user interface. At this point, you can begin debugging your remote application. The following animation highlights the process.

The TotalView Reverse Connect feature is compatible with the other remote debugging technologies. For example, you can run the TotalView UI locally on your laptop and launch a remote debugging session on a remote system. A parallel job submitted through a job scheduler such as SLURM is launched under the control of tvconnect, TotalView’s Reverse Connect feature. The tvconnect process will connect to the remote TotalView session and enable a full remote debugging session from the laptop to a remote cluster. The following diagram illustrates the final remote debugging layout.
Next Steps and Additional Resources
Looking for additional support on setting up TotalView RDC remote debugging or remote development for you or your team, or have questions about TotalView?
- Watch the Remote Debugging Video Tutorials for useful short video segments that demonstrate each feature.
- Attend a demo and ask your questions live.
Note: This post was originally published on March 2020 and has been updated for accuracy and comprehensiveness.
